Monday, 13 February 2017

construction of the Advert


This is the process of our editing for our advert.


We took these pictures at Eastbrook using their photography studio using their grey setting and stool. Due to Sarah taking photography we had easy access to this and she used her photography camera to take the pictures, due to this the images was successful and looked rather professional. I was then positioned into a variety of postures which we all thought would look best. We then cropped the images down to the right size that we wanted and thought looked best for a magazine advert.


We then went onto adding the text and playing around with the font. We all really liked the first chosen font as we thought it suited the theme of school and teens being portrayed in the music video.


We thought that it would be best to try and reposition the text and change the font too see if it would look better or worst, we mainly changed the font to see what different styles would look like when we did this we preferred the layout however liked the font before so we went back and changed the font whilst keeping the layout.


After this we went in to add different social media platforms in which we had an idea the audience would go onto with following platforms in which you can buy the artists song. This is what a magazine advert requires as the point is advertisement and getting people to purchase the song.


To Finnish off we added some quotes from reviews and star ratings, We used this as its a good feature to use to encourage people to purchase it s people go by ratings and reviews and trust them.

After we completed this it was overall complete as we could see from the process we didn't need to edit the image due to it having the perfect exposure and the perfect amount of shadow and background so we didn't need to edit any further.


Saturday, 11 February 2017

Constructing The Digipak

To start with we needed to take some images to use on our digipak. We took a variety of different types of images so that we had a choice of a few options we picked out the best images that we took they are stated below before having manipulating them into photoshop.


After we had all the images together and selected the best ones we see ourselves using Sarah opened photoshop and set them out making small changes by putting the images into different orders and over the top of a digipak template, we then all disgussed what would look best so Sarah then rearranged them to see what fits best.


Sarah was good at photoshop as she studies photography and she started too manipulate a few images by overlaying layers and changing the opacity on the top layer but we all found what she was doing didn't fit the theme of the song and it didn't look the highest quality. The images was later discarded when Sarah played around and created better images, below is an example of one of the images that was discarded.  


After playing around with a few images on photoshop we all decided what images we was going to use on the final digipak below are the original pictures before the was manipulated. 


At this stage Sarah began to manipulate the individual images with mine and Louis's in put . She took some of the stages and applied them to all of the images, the standard stages started with Sarah cropping them to fit the dimensions of a digipak panel, removing the background as we had decided to use a plain white background so that all of the images matched. 
Sarah used the crop tool in order to size the images to the right dimensions. 


Sarah used the quick selection tool to select the background so that she could remove it from the subject in the foreground. One the whole background was selected she used the eraser tool to erase the background and then inserted a white background so all of the images matched.


Sarah then had to crop the images down again to the right size on the white background so that they would fit the dimensions of the panel of a digipak. Once all the images were a equal size and all matching with the white background she started creating the colourful overlay images that we all planned to use for our two inside panels and back panel.


This started with Sarah using the quick selection tool again to select the subject in the foreground. She then copied the layer three times moving each over a tiny bit at a time, In the side bar Sarah selected the opacity and turned it down more and more for each layer with the layer on top being most opaque. She then used the hue and saturation mask tool in the side bar and changed the hue for the bottom two layers, The back layer was changed to a purple hue, the second had changed to a green hue and the top layer was kept normal in this image. 


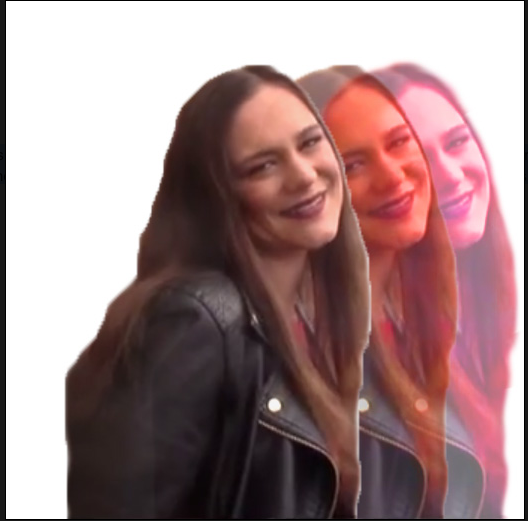
Fir the other image the same steps were taken. Although in this image we wanted to have a different colour scheme we all agreed that we thought more of a red tone however we was unsure which so Sarah played around with some different colour schemes to see what would look the most ideal. Below are the four examples of the colour schemes we was looking at; 


As a team we all sat down and looked at all of the images in detail to see which we liked best, it took some time for us to agree on what was best and we had some detailed discussions over the images as we compares the positives to the negatives of each image and the colour schemes. 


In the end we all decided on the red pink toned one that was at the lower opacities in the back two layers. We chose this one as it was more red toned however it wasn't too overpowering, it also fit best with the other already edited image. Below is our chosen image. 


The third overlay image, the one for the back panel we wanted to take the two previous edited overlay images and place them back to back showing the transformation from unpopular to popular showing how drastically her appearance changed. Sarah adjusted the size a little for each of the two images and also used the quick selection tool again to select a selection of my shoulder in the red image to remove it as it was overpowering the back image of the purple and green image. 


This is the final combined back panel images. 


When we was at this stage of process Sarah started placing images into the digipak template and started adding all the finishing touches. We decided as a group Sarah should add some text we decided to have some quotes from the lyrics in the song. We decided to use the same font as we did on the advert to make it match. Sarah dropped the opacity on the text due to the overlay effect we decided this would look best to make the text fit with the image in the background best. 


The Digipak was starting to look like this. 


we then went in flipping all the images at the top over and text due to it being a digipak. 


Below is now our completed digipak 

Friday, 10 February 2017

Rough Cut and Audience Feedback

To get feedback on our music video we got a group of people to view it and give us their opinions on our rough cut.

Below is a picture of them viewing our rough cut.


We got some really useful feedback people said that the second half was better than the first and the lip syncing at the end of the music video where I am walking as a cool kid with a  dolly shot looked really effective and went really well. They also said the way we ended the video was really creative. However they said that the escalator scene looked a little bit messy and it was too long. Another improvement they gave us was the lip-syncing at the start of the music video behind the black wall due to the fact they said I looked really washed out and the lip syncing and shots was rather messy and made the shots look rather unprofessional in comparison to the rest of the music video.


After getting this feedback we discussed it and decided to cut bits of the music video to make it look more clean and cut it down a lot. We also added a little more lip-sync to cover the empty spots were this was before. We think this looked much better and realised that it was a little messy prior to this.

We then discussed trying to fix the black background lip-sync and tried fixing it by editing the colour of it to make me look less watched out but then we discussed how I don't look very comfortable and my lip sync is not as good as it was in other lip syncing clips. We decided that we are going to re film this footage next lesson and then carry on editing our music video with transitions and effects.

Overall the feedback was really successful due to the fact it helped us get our music video perfect and the positive feedback really helped us see what we did which was a success.


Cool Kids Rough Cut 

Monday, 6 February 2017

Editing 2

Once we finished our filming and edited our rough cut we used this as a basic structure in which we could build our final music video from. We then changed some footage as we didn't think it looked as great as we had hoped for and our feedback on our music video rough cut stated that due to the feedback clearly saying this didn't look as good as the rest of the music video and due to this was pulling the standard down. We then added in effects such as colour correction, slow motion, brightness, and some transitions.


After this we decided to watch it a few times so that we could see if there was things in which we was like to change and to make sure that everything was overly perfect. we then did some slight changes like shortening some clips and transitions.

After we did this we made people watch it before exporting it to make sure its at its best standard and that nothing needed to be improved they then stated things such as you could see slightly in the background of a clip a tripod so we went back and swapped clips around to get rid of this issue.


Sunday, 5 February 2017

Editing 1

Today we are uploading the footage in which we had taken throughout our filming. There was a lot due to the fact that previously when filming our thriller we did not shoot enough, so we made sure to get a lot of footage this time round.

We went through all our footage and made files. One saying rubbish, another useable footage and our best bits and then started to put it all together to make the rough cut.We didn't want to get our footage all mixed up as there was a lot of it however any footage is useable even if it is not the best of quality and we may need footage we don't expect to use so we made sure we kept this footage in a different folder as we didn't want to end up being stuck.

When organising our footage we started to cut down clips to how we would want them in our video, this helped us to gather an idea on what clips will stay and what ones we won't be using. We also when doing this decided what scenes will go where in our music video and how we will fill it out. There was much more planning then editing however we did start to create our rough cut but there was so much footage that sorting it out and planning where it goes took longer than expected.


Overall our first day o editing went well however we got little done but we didn't want to rush and produce something of bad quality. We was glad of our footage and didn't miss anything that we thought we should have gone back to film. 


Friday, 3 February 2017

Filming the music video Day 2

The second day we went to lakeside to shoot the bits of footage for me and Sarah, We shot me in my ' unpopular' clothes and also in my ' popular clothes' we walked around the shops browsing clothes and make up, Louis filmed us in some footage without us knowing just browsing shops so it looked much more natural. We also did a scene of me and Sarah going up the escalators. When changing hair, makeup and costume we  went into the bathroom to get changed.


The days filming went really well we managed to get everything we needed and it went really successful. The escalator scene took a while to shot perfectly however it went great in the end. We didn't really have any negatives when filming or any troubles.

We are glad we got al the footage that we did and we tried a  variety of different shots it shows how well we have improved since shooting for our thriller. We thought due to only being able to take a camera to Lakeside and not any other equipment that this may course some troubles and make our footage look at a bad quality however we made sure to have a stiff hand and we didn't see any problems with this.


Above is a picture showing us looking around the stores for make up to show a rough idea on the type of shots that we took. 

Overall our final bit of filming went very well and we are as a team glad to start editing our music video. 

Wednesday, 1 February 2017

Filming The Music Video First Day.

In this post I am going to be discussing my first day of editing and how it went. In the day's set of editing Myself, Louise, and Sarah decided to shoot the ' Cool Kid music video where myself is ' Uncool' A picture below shows Sarah converting my look. She created pig tails in my hair and I changed my outfit too a long ' granny' looking dress. I made sure that i didn't put any make up on and looked rather bare. Louis was going to add a monobrow however we thought it would be too comical and not look very realistic. Below is Sarah doing my hair.


The first shot we decided too film was me and my only friend Sarah sitting in school whilst reading books and admiring the' Cool Kids'. We shot this in a corner doing different shots using 
different camera angels as we decided this time to gather lots of extra footage and after filming footage for our thriller we realised we needed more footage and whited we shot more. When watching this scene back we didn't like the background much and decided we might possibly go back and re film some. 

We then decided to use a computer room in our school to use the lights specialised for photography where i sang the song. We then used the white sheet used for shoots to create a sillouette to show my shadow which we found very creative as i danced. 

We then for a final shot in school changed to the drama room where we shot a scene where Louis being a Cool Kid knocked me and my books on the floor. We shot this is many different ways making sure the camera picked up different reactions to be able to change. 

We then decided to film at my house Where i get dressed up by Sarah into a cool kid. This is where my make up gets changed with lots of close up shots of the products. 


The first bit of filming went well we like the fact we have lots of extra footage incase and it gave us more ideas for future filming.